Forward
This page provides access to many sound samples that can be used to compare the difference in sound between two channels of a Presonus model M80 eight channel microphone preamplifier and describes the manner in which they were gathered. One of the channels compared had a Jensen Transformers model JT-11K8-APC input transformer installed and the other channel had a Presonus generic transformer installed.
It is important to realize that even though a lot of time, effort and resources went into this comparison test to make it accurate and useful, this is NOT a particularly scientific or controlled test. Many things were either ignored, assumed accurate and / or forgotten about at the time of testing and any one of these could adversely affect the results.
Here is a short list of items that should have been checked and verified :
1) The two microphones are identical models that were purchased at the same time from the same vendor but have minor cosmetic differences that seem to indicate they came from different production runs. They were not verified to be matched.
2) Two microphones cannot occupy the exact same physical space at the same time. Since they were placed as close as possible to each other and carefully angled it was assumed that the differences in sound captured by each mic would be minimal but this was not verified.
3) The mic cables used were identical lengths of the same model, made by the same manufacturer, purchased at the same time and were assumed to be exactly the same but this was not verified.
4) Before the Jensen transformers were installed, the two channels that were to be changed should have been verified to be exactly the same as the remaining six channels. This was not thought of at the time.
5) It was also assumed that the output cables connecting the M80 to the recording deck were identical. Also the accuracy and performance of the input circuitry and converters in the recording deck were assumed to be identical.
So, please keep all of the above in mind and avoid forming a definitive opinion while reviewing the materials presented here and reserve final judgment until you can perform your own hands on tests.
The Recording Chain
The recording chain was a simple one. Two microphones of the same model were connected by the same type and length of mic cable to the preamp inputs and then the preamp outputs were connected to the recording deck inputs by equal length cables. Once all samples were recorded they were digitally transferred to a computer to edit content length and convert them to the various formats and sample rates used on this page.
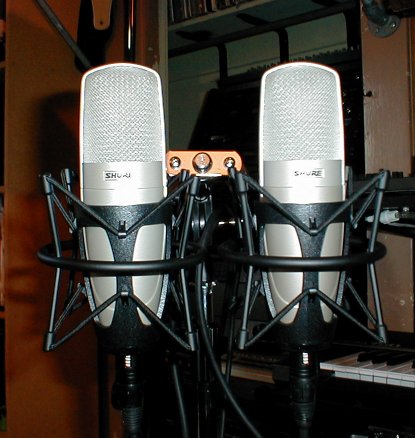
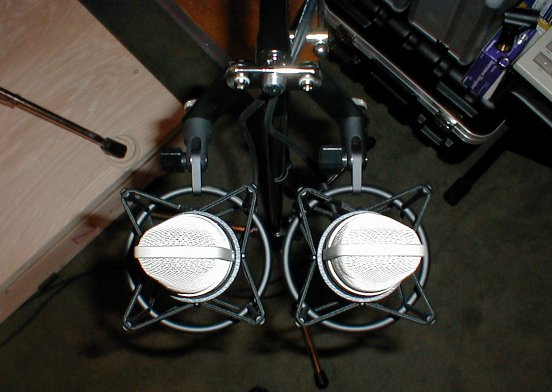
Microphones
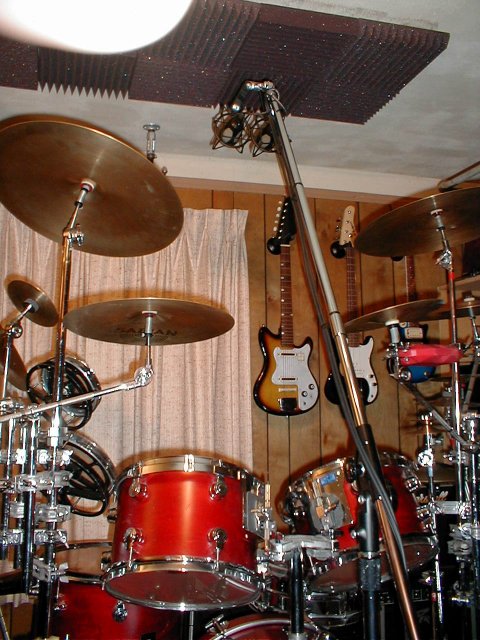
The two Shure KSM32 mics were placed in their shock mount holders and attached to the mic stand with an adjustable stereo bar. The mics were set at the same level and aimed so that their pickup patterns were as parallel as possible. The bass roll off was disengaged and the pad was only used on the loudest of sources.
|
|
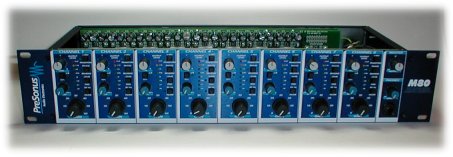
The Preamp
The gain controls of the M80 were adjusted to be as equal and as loud as possible with out clipping by viewing the front panel meters. ( on a couple of the electric guitar samples I allowed the clip light on the M80 to flash fairly often ) The phantom power was turned on and all remaining controls were in their off or zero positions with the exception of one electric guitar sample where the IDSS control was turned to 50% on both channels.
Recording Deck
The balanced output of the M80 was sent to two channels of a Fostex D824 stand alone hard disk recorder with the 5042 balanced I/O option. A bit depth / sample rate of 24 / 48 was used. The transfer to the computer for editing was accomplished using the D824's lightpipe output.
Computer System
The Pentium III computer uses a MOTU 2408 ( MkI ) interface to handle all analog and digital audio I/O. Steinberg's WaveLab 3.03 software was used to perform content length edits, normalizing between channels and format conversions. No other processing took place.
The Performers
Paulo - All acoustic guitars, electric guitars, electric bass and vocal performances.
My good friend Paulo was kind enough to spend several hours of his time and share his excellent and versatile talents during the busy holiday season to record samples for this site. Thanks Paul!!! :-)
As you will see in the guitar and bass sections there are several samples simply indicated as 'Improv'. Many of the improvisations contain familiar melodies by famous bands that will probably be obvious to most. If the owners of the copyrights to these songs wish them to be removed or proper credit and copyright information to be posted along with them, please feel free to contact me and I will be happy to do so.
John L Rice - All the drum and percussion performances.
The Equipment
Acoustic Guitar - Tacoma Guitars Papoose P1E
Electric Guitar - Steinberger Spirit GT-Pro
Guitar Amps - Electar Tube 10 and a Marshall 8040
Electric Bass- Steinberger Spirit XT-2
Bass Amp - Peavey Basic 50
Drumset - Tama toms and bass with a Ludwig Snare, Remo heads and Roto toms, Zildjian HiHats
Percussion - small djembe, tambourine, stainless steel baking pan
( All instruments and amplifiers are part of my studio collection. The drum heads and acoustic guitar strings are desperately in need of a change . . . sorry Paulo! )
IMPORTANT : The sound of both of the different preamp channels is contained within each MP3 and WAV file. To be able to compare them DO NOT LISTEN TO THEM IN STEREO! Listen to the right side by it's self and then listen to the left side by itself.
You can do this by quickly turning the pan control back and forth on your stereo or with the pan control on your computer software. The best method seems to be to play the files into your mixer, pan each channel dead center and then use the mixer's channel mute buttons to alternate back and forth between the two.
I used this method so that the two channels could be rapidly compared against each other and the listener isn't required to 'remember' what one sounded like while the other is listened to. Also, in comparison tests where many separate performances are recorded through different mics or preamps, slight variations in the performances can occur and can be distracting when trying to listen for subtleties in the sound quality.
That said, the main problem with this method is that, as earlier mentioned, two mics cannot be in the exact same place at the same time and even very slight differences in the position of a microphone can change the sound it picks up. In retrospect I probably should of used mics with an omni pickup pattern instead of the cardioid pattern mics I did use since omnis might of been less sensitive to the slight positioning differences. ( see the Microphone Expressions Lexicon for explanations of microphone polar patterns and more! )
If you are interested in doing more listening tests beyond what this site has to offer be sure to check out Lynn Fuston's 3D Audio site and his excellent and very precisely done 3D Pre CD's and the 3D Mic CD. These CD's will allow you to audition and compare over $200,000 worth of mic preamps and mics right in your own studio. After experiencing the time and effort it took me to produce this simple site I am suitably humbled and impressed with Lynn's fine efforts!
A Few Last Things
While the MP3 files were encoded in WaveLab at 320 Kbps with the 'high quality' setting, there is still a noticeable loss of quality compared to the WAV files and this loss makes the subtle differences between the two preamp channels much harder to detect. Use the WAV files when possible to hear the differences more easily.
You'll notice that many of the WAV samples and wave form images are missing. This is partially due to the fact that I was only half way through editing and normalizing the files when my computer had some lock ups and the MOTU 2408 PCI-324 card died as a result. I wanted to get this site done so I finished doing what normalizing and editing I could do by sight alone. ( Many thanks to the MOTU support staff for the quick turn around on the replacement though! :-) Also I'm limited on space at my site and I'm also limited on time as well, I'd really rather be making music than analyzing music hardware! If I have time I will add more of the wave form images and add some more WAV files ( which will also require me to reduce the size of some of the large WAV files already on the site. )
At the bottom of this page are three links that will take you to the various stages of my comparison experience. The first is 'The Overview' and will explain the circumstances that led to changing transformers in the first place. The second link is 'The Transformer Swap' and will explain what I had to do to change out two of the transformers in my M80. The third is a short discussion of what my conclusions and opinions are about the tests.
I sincerely hope that you will find this site interesting, if not useful, and I'm open to any comments or suggestions you might be willing to share. I would be particularly interested in hearing about which transformer you preferred for each sound source and why.
Best of luck!
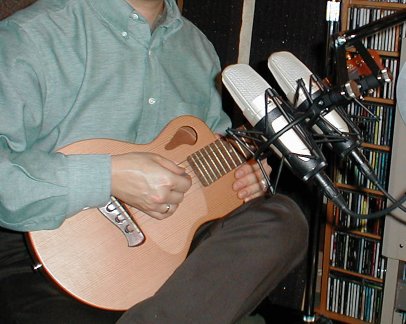
Acoustic Guitar
There are samples recorded at a distance of both eighteen inches and nine inches. The strings on this guitar are very old but Paulo played beautifully regardless!
| Image | Description | MP3 | 16 / 44.1 WAV | 24 / 48 WAV | |
 |
Single Notes At 18" | ||||
| Single Notes At 9" | 2,050 KB | ||||
| Chords At 18" | 1,422 KB | ||||
| Chords At 9" | 1,790 KB | 992 KB | 1,625 KB |  |
|
| Improv At 18" | 1,336 KB | 5,888 KB | |||
| Improv 1 At 9" | 3,828 KB | 16,873 KB | |||
| Improv 2 At 9" | 4,937 KB | ||||
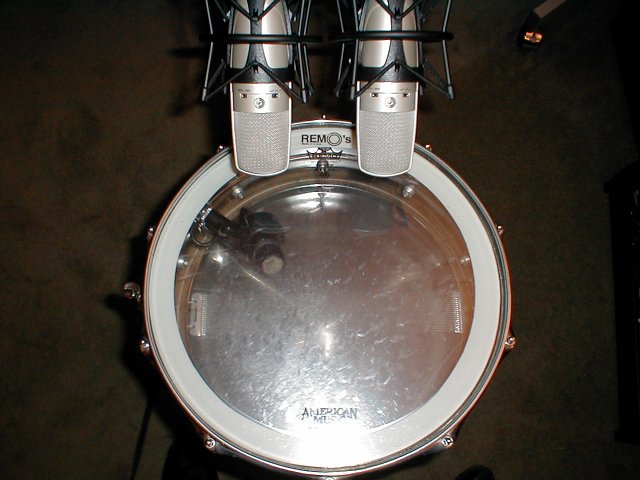
Drums And Cymbals With Overhead Mic'ing
Listen for the very low frequency stand vibration on the Roto Tom sample.
| Image | Description | MP3 | 16 / 44.1 WAV | 24 / 48 WAV | |
 |
Floor Tom | 389 KB | 640 KB |  |
|
| HiHats | 1,122 KB | 4,940 KB | |||
| Roto Tom | 915 KB | ||||
| Snare | 868 KB | ||||
| Toms and Bass | 661 KB | ||||
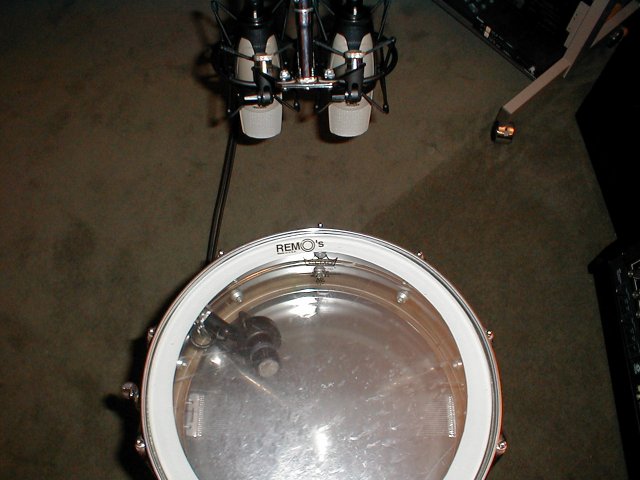
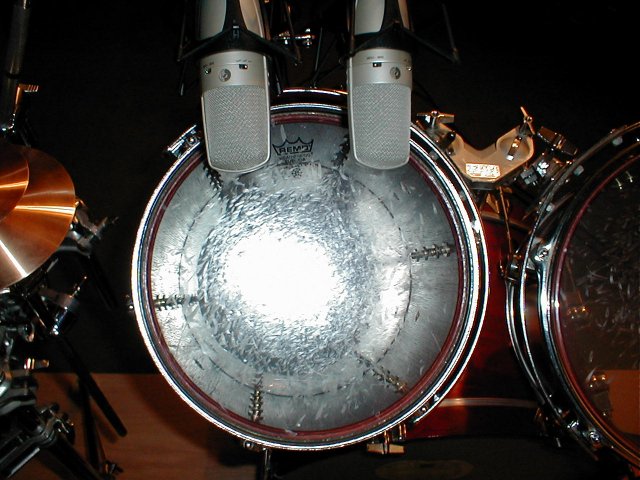
Drums Close Mic'd
Note how old these heads are and the somewhat odd angle that the snare is mic'd with in the third image.
| Image | Description | MP3 | 16 / 44.1 WAV | 24 / 48 WAV | |
|
|
Bass Drum Single | 304 KB | 501 KB |  |
|
| Bass Drum Double | 451 KB | ||||
 |
Snare Single Notes Shell | 1,250 KB | 298 KB | 491 KB |  |
| Snare Cadence Shell | 683 KB | 3,004 KB | |||
 |
Snare Single Notes Top | 1,426 KB | 337 KB | 556 KB | 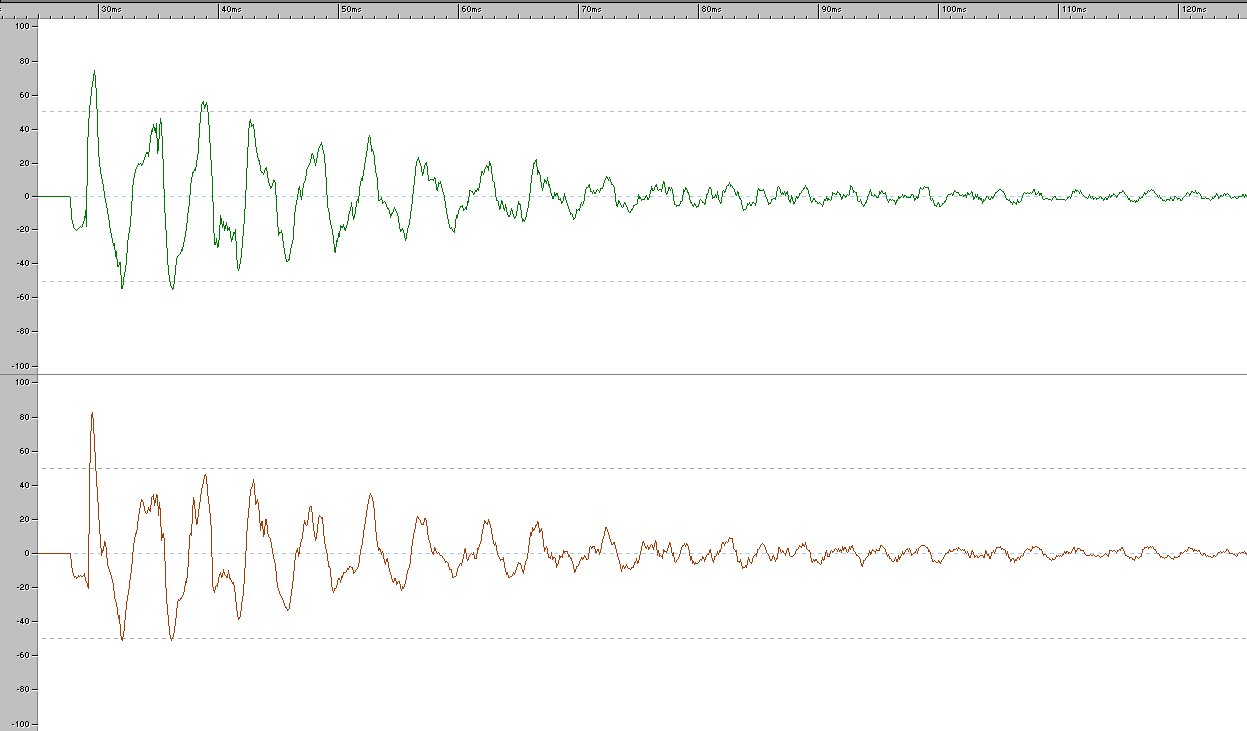 |
 |
12" Tom Flams | 589 KB | |||
| 12" Tom Single Notes* | 540 KB | 267 KB | 442 KB | 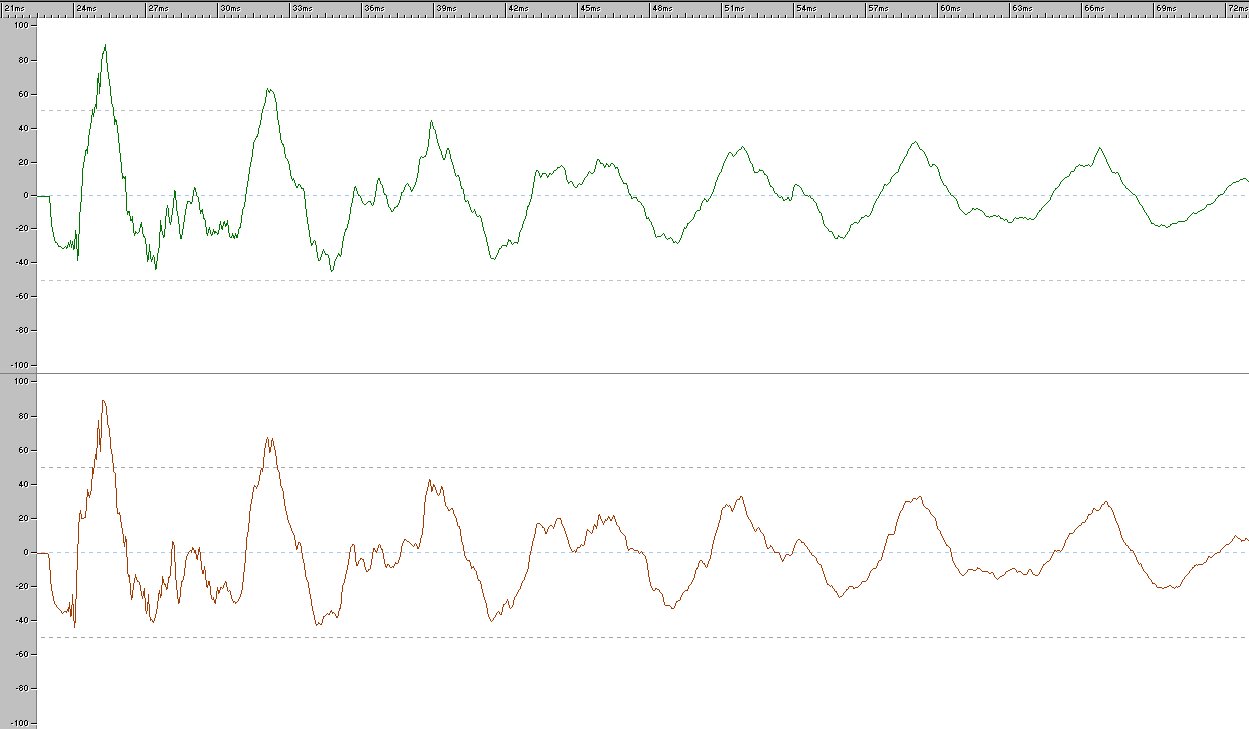 |
|
Electric Bass
No image of the mic positioning but it was very similar to the way the VS40V was mic'd ( see below )
| Image | Description | MP3 | 16 / 44.1 WAV | 24 / 48 WAV | |
| ( no image available ) | Single Notes | 1,194 KB | 1,955 KB |  |
|
| Improv | 882 KB | 3,892 KB | |||
Electric Guitar
No image of the mic positioning for the Tube 10 but it was very similar to the way the 8040 was mic'd. ( * 8040 - Improv 2 has a Roland Phase-II phase shifter between the guitar and amp )
| Image | Description | MP3 | 16 / 44.1 WAV | 24 / 48 WAV | |
| ( no image available ) | Tube 10 - Single Notes | 870 KB | 1,425 KB |  |
|
| Tube 10 - Chords | 1,855 KB | 1,093 KB | 1,790 KB |  |
|
| Tube 10 - Improv 1 | 500 KB | 2,195 KB | |||
| Tube 10 - Improv 2 ( IDSS @ 50% ) | 828 KB | 3,643 KB | |||
 |
8040 - Single Notes | 1,906 KB | 1,192 KB | 1,951 KB |  |
| 8040 - Chords | 2,485 KB | 3,373 KB |  |
||
| 8040 - Improv 1 | 1,982 KB | 8,732 KB | |||
| 8040 - Improv 2 * | 2,044 KB | ||||
Male Vocals
No image of the mic positioning but Paulo was standing with the mics about eight inches away and a home made pop filter in-between.
| Image | Description | MP3 | 16 / 44.1 WAV | 24 / 48 WAV | |
| ( no image available ) | Scale | ||||
| Improv | 1119 KB | ||||
Various Percussion
No image of the mic positioning. The tambourine was anywhere from four inches to ten inches away from the mics and played standing. The pan and the djembe were played while seated and the mics were about twelve inches above and towards the front.
| Image | Description | MP3 | 16 / 44.1 WAV | 24 / 48 WAV | |
| ( no image available ) | Small Djembe | ||||
| Stainless Steel Pan | 1,528 KB | ||||
| Tambourine | 2,158 KB | ||||
Channel / Transformer Indicator
The MP3 and WAV files contain two snare drum hits on one stereo side and two bass drum hits on the other stereo side. Listen to the file and then click on the 'Show Me' link in the 'Channel?' column to see which channel was the Jensen channel and which was the generic channel for all of the examples on this page.
It is HIGHLY recommended though, that you listen to all of the above samples, look at the waveform images and write down your preferences before you know which channel is which to avoid biasing your judgment one way or another.
| Description | MP3 | 16 / 44.1 WAV | Channel? | |
| Channel Indicator | 556 KB | Show Me | ||
| An explanation of the circumstances that led to changing transformers and conducting listening tests. |
| A description of how to remove existing transformers and install different ones. |
| My conclusions and opinions about the testing. |
| What Other People Think |
| Tests, modifications and opinions of others. |